Diffusers
This page provides examples that build model containers from models built with the  Diffusers library.
Each example requires the diffusers package be installed at a minimum. Use pip to install this in your Python environment:
GPU Recommended
Like most computer vision-based and generative AI-based models, fast performance is heavily dependent on available hardware resources. For a smoother experience, it is highly recommended that you only follow these examples if you have access to a GPU.
Instruct Pix2Pix
This Diffusers example was adapted from the InstructPix2Pix model from Hugging Face. View the original model card here.
Source Code
If you prefer to view the source code directly, reference this example and utility data files here.
First, install the additional dependencies required by this model.
Now, simply copy the below example code in your Python environment and editor of choice.
Example
The below code can be used to build a model container out of a stable diffusion example model. Be sure to view the code annotations for more details.
import time
import torch
from PIL import Image
from diffusers import StableDiffusionInstructPix2PixPipeline, EulerAncestralDiscreteScheduler #(1)

import io
from typing import Mapping, Dict
from chassisml import ChassisModel #(2)
from chassis.builder import DockerBuilder, BuildOptions #(3)

# load model and define pipeline from diffusers package #(4)
model_id = "timbrooks/instruct-pix2pix"
pipe = StableDiffusionInstructPix2PixPipeline.from_pretrained(model_id, torch_dtype=torch.float16, safety_checker=None)
pipe.to("cuda") #(5)
pipe.scheduler = EulerAncestralDiscreteScheduler.from_config(pipe.scheduler.config)

# define predict function # (6)
def predict(inputs: Mapping[str, bytes]) -> Dict[str, bytes]:
    img = Image.open(io.BytesIO(inputs['image'])).convert("RGB")
    text = inputs['prompt'].decode()
    image_results = pipe(text, image=img, num_inference_steps=10, image_guidance_scale=1).images
    with io.BytesIO() as output:
        image_results[0].save(output, format="PNG")
        contents = output.getvalue()
    return {'results.png': contents} #(7)

# create chassis model object
chassis_model = ChassisModel(process_fn=predict)                                                       # (8)
# add metadata & requirements
chassis_model.add_requirements(["diffusers", "accelerate", "safetensors", "transformers",   "Pillow"]) # (9)
chassis_model.metadata.model_name = "Stable Diffusion Instruct Pix2Pix"                                # (10)
chassis_model.metadata.model_version = "0.0.1"
chassis_model.metadata.add_input(                                                                      # (11)
    key="image",
    accepted_media_types=["image/jpeg", "image/png"],
    max_size="10M",
    description="Input image to be modified or transformed"
)
chassis_model.metadata.add_input(
    key="prompt",
    accepted_media_types=["text/plain"],
    max_size="1M",
    description="Text prompt with instructions for the model"
)
chassis_model.metadata.add_output(
    key="results.png",
    media_type="image/png",
    max_size="10M",
    description="AI-generated image based on input image and instructions prompt"
)

# test model  # (12)
img_path = open("data/example.jpg", 'rb').read()
text = b"turn him into captain america"
results = chassis_model.test({"image": img_path, "prompt": text})
# test output results  # (13)
test = Image.open(io.BytesIO(results[0]['results.png'])).convert("RGB")
test.save("example_out.png")


# define build options and builder object # (14)
build_options = BuildOptions(cuda_version="11.0.3")
builder = DockerBuilder(package=chassis_model, options=build_options)

# local docker mode (#15)
start_time = time.time()
res = builder.build_image(name="stable-diffusion-instructpix2pix", show_logs=True)
end_time = time.time()
print(res)
print(f"Container image built in {round((end_time-start_time)/60, 5)} minutes")
- Here, we simply import the objects we will need from the
diffuserslibrary - Now, we will import the
ChassisModelclass from the Chassis SDK - In addition to the
ChassisModelobject, we need to import a Builder object. The two available options,DockerBuilderandRemoteBuilder, will both build the same container but in different execution environments. Since we'd like to build a container locally with Docker, we will import theDockerBuilderobject. - Here, we are loading our model in the exact way the model card on Hugging Face recommends
- Running on GPU will dramatically improve performance
- Here, we will define a single predict function, which you can think of as an inference function for your model. This function can access in-memory objects (e.g.,
modelloaded above), and the only requirement is it must convert input data from raw bytes form to the data type your model expects. See this guide for help on converting common data types. In this example, we process the raw bytes data using the Pillow library and theio.BytesIOfunctionality, pass this processed data through to our model for predictions, and encode the output image in the PNG image format. - Notice we are returning a Dictionary where the key-value pair is
str-->bytes, but in this case, thebytesobject is an image. - Now, we will simply create a
ChassisModelobject directly from our predict function. - With our
ChassisModelobject defined, there are a few optional methods we can call. Here, we will add the Python libraries our model will need to run. You can pass a list of packages you would list in arequirements.txtfile that will be installed with Pip. - In the next few lines, we will define the four minimum metadata fields that are required before building our container. These fields represent your model's name, version, inputs, and outputs. NOTE: There are many other optional fields you can choose to document if preferred.
- Notice we are adding two inputs. Chassis supports multi-input and multi-output model use cases.
- Before kicking off the Chassis job, we can test our
ChassisModelobject by passing through sample data. - Since our
predictfunction returns encoded bytes, we can use the Pillow library to convert to a numpy array and save the output to verify the model output. - After our test has passed, we can prepare our model build context. To do so, we will first define a
BuildOptionsobject to pass the specificcudaversion we prefer to use. Then, we define our builder object, which as mentioned before, will beDockerBuilder. This builder object uses your local Docker daemon to build a model container and store it on your machine. - With our builder object defined with our model and build options as parameters, we can kick off the build using the
DockerBuilder.build_imagefunction to build a Docker container locally.
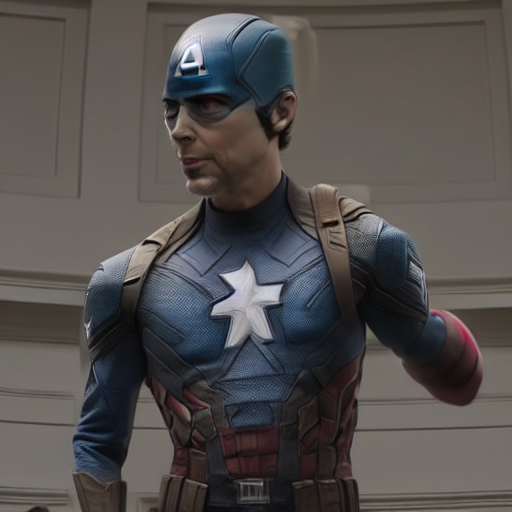
Using the data inputs provided in the sample data folder, the inputs and outputs of this model should look similar to the following:
Sample input

Prompt
"turn him into captain america"
Sample output